World Tracking Planes
The World Tracking Planes Example provides multiple Tracked Planes on the surfaces your device detects, allowing developers to understand and utilize the physical environment in Augmented Reality
- Snapchat: fully supported
- SPECS: not supported
- Camera Kit Web: not supported
- Camera Kit Mobile: fully supported
- SnapchatFully supported
- SPECSNot supported
- Camera Kit WebNot supported
- Camera Kit MobileFully supported
World Tracking Planes provide Tracked Planes based on the surfaces your device detects. This allows your experience to match your environment. This example uses the World Tracking Planes API to manage planar scene objects that have collision and occlusion. It includes two example experiences: spawning static objects and launching physics objects.
World Tracking Planes API
The World Tracking Planes API consists of three events:
WorldTrackingPlanesAddedEvent: Triggered when planes are newly detectedWorldTrackingPlanesRemovedEvent: Triggered when planes are no longer detectedWorldTrackingPlanesUpdatedEvent: Triggered when currently detected planes are updated
Each event returns an unordered array of Tracked Planes. This array gives us a position, orientation, and size of the plane. Learn more about these events and see sample code in the API documentation.
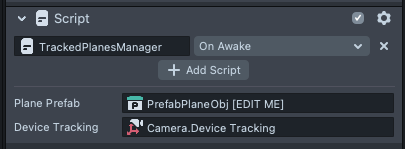
To use the World Tracking Planes API in our TrackedPlanesManager.js, we must be sure to:
- Add the Device Tracking component to the
cameraand set it toworld. - Write
deviceTracking.worldOptions.nativePlaneTrackingType = NativePlaneTrackingType.Bothat the top of the script.

How This Example Works
The World Tracking Planes API gives us Tracked Planes, but we want collision. For that reason, in this example, the TrackedPlanesManager.js updates an array of in-scene plane objects that have collision on them.
The plane object prefab has the PlaneObj.js script on the root, which refers to the plane object's render mesh visual, collider, debug text, and materials to use based on whether the plane's orientation is horizontal or vertical.
TrackedPlanesManager.js orients the PrefabPlaneObj [EDIT ME] root and scales the Unit Box (cm) child to match the correlating Tracked Plane returned by the World Tracking Planes API events. (We don't scale the root because we want the DebugText child to stay the same size.)

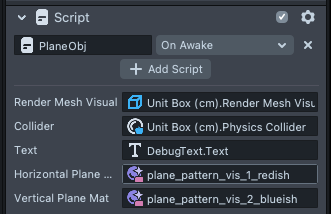
The code that scales the Unit Box (cm) scene object works because the mesh is a unit box - 1 cm cubed. If you drop a non-unit mesh into this field, scaling will be off.
Customize the look of your planes by editing and applying changes to the PrefabPlaneObj [EDIT ME] prefab:
- Change the texture by selecting the current pattern material in the
Asset Browser panel->Materialsfolder and dragging a new texture into the Inspector Panel > Graph Parameters > Pattern field. - Create new materials for your planes.
Several Lens-side operations are going on to enable the examples below. Because we have box colliders to work with, and the event Tracked Planes have a height of zero, TrackedPlanesManager.js sets a shallow height of .5 units for the instantiated plane objects. Their child Occluder object functions to hide what is behind the plane.
PlaneObj.js also stores a reference to the Tracked Plane that it's based on. TrackedPlanesManager.js uses this to make sure our in-scene plane objects match the constantly changing array of TrackedPlanes returned by the World Tracking Planes events.
The World Tracking Planes API is seeking to create a static scene of the most accurate planes. That means that the plane objects in the scene are always shifting. You cannot rely on a given plane to be ever present; parenting new objects to plane objects is not recommended.
Compatibility
| Platform | Horizontal | Vertical |
|---|---|---|
| iOS | ✅ | ✅ |
| Android (ARCore) | ✅ | ✅ |
Limitations
The World Tracking Planes technology performance varies based on the scene layout, lighting conditions, and the player's movement in the scene. Performance notes:
- Roughly 1.5 seconds to initialize
- 2-3% of distance accuracy
- 0.7-2.5m range
- Needs textured surfaces (not white wall)
- Needs reasonable lighting conditions (won’t work in twilight)
Examples
The example comes with two examples. These examples can be found in the Scene Hierarchy panel under their names. Try enabling the example scene object by pressing the tick-box to the right of their name.
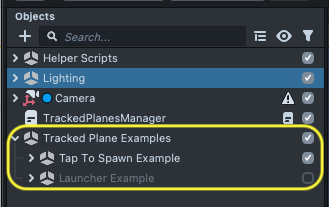
Test this Lens on a device. Currently, planes appear incorrectly in the Lens Studio Editor Interactive Preview mode of the Preview panel. Stay tuned for this bug fix.
Tap To Spawn Example
This example allows you to spawn any prefab in the world. TapToSpawn.js gives you customization as to how to add some randomization and offset relative to the plane orientations you'd like to spawn.
Set Up Object Spawning
First, create a prefab. Then modify the example to spawn our own prefab in the world. To do that, select one of the Tap To Spawn [EDIT_ME] objects under the Tap To Spawn example.
Then in the Inspector panel, replace the prefab input with the prefab we just created. Adjust the TapToSpawn.js properties to customize how and where your prefabs are spawned:
- Prefabs: Tapping will spawn a random prefab from this list.
- Surface Type: Spawn on a
Horizontal,Vertical, orBothsurfaces. - Min Offset From Plane: The minimum distance in unit cm from the plane to the spawn position.
- Max Offset From Plane: The maximum distance in unit cm from the plane to the spawn position.
- Up Axis: Choose Plane Normal to align your prefab's up axis with the plane's up axis (that is, the
plane normal). Choose Unchanged for your prefab to spawn as it appears in the editor. - Fwd Axis: Choose Random to rotate your prefab to a random angle around the up axis. Choose Unchanged for your prefab to spawn as it appears in the editor.
- Min Scale: The minimum % original scale for the spawn scale.
- Max Scale: The maximum % original scale for the spawn scale.
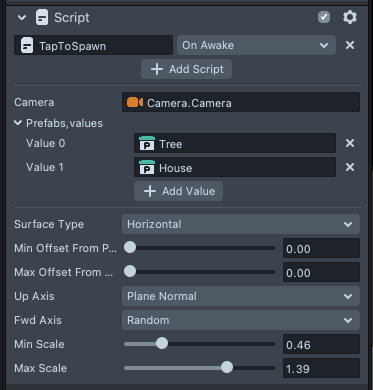
To eliminate randomization:
- Add only one prefab to the array
- Set the min and max offsets to the same value
- Set the min and max scales to the same value
Launcher Example
This example shows how we can launch physics objects onto the world tracking planes and see them interact.
Set Up Object Launching
First, create a prefab. Make sure your prefab has a Physics Body component on the same scene object as your Render Mesh Visual component. Add these settings to you Physics Body component:
- Set the Shape Type to match your Render Mesh Visual.
- Select Fit Visual or set the collider size manually.
- Select Dynamic.
Then modify the example to launch our own prefab in the world. To do that, select the Launcher [EDIT_ME] object under the Launcher example. Drag your new prefab into the Launcher.js Prefab field. This script has four modifiable properties:
- Prefab: the prefab to spawn and launch
- Launch From Obj: the transform to use for the launch position
- Timer: the duration of time in seconds between launches
- Force: the force applied to the prefab on launch. This vec3 is applied in space local to the Launch From Obj.
Previewing Your Lens
You’re now ready to preview your Lens experience.
- To preview your Lens in Snapchat, follow the Lens Studio Pairing to Snapchat guide.