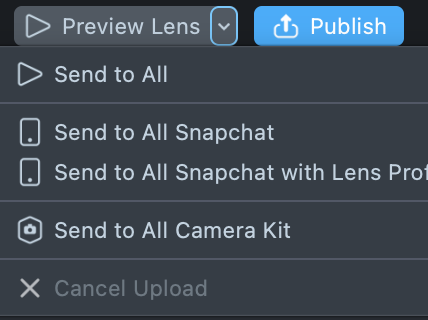
Lens Studio's toolbar is made of up of a collection of tools that allow you to configure your project's info, access various tools like Asset Library and Lens Studio AI, preview your Lens from within Snapchat, and even publish your Lens for the world to see.
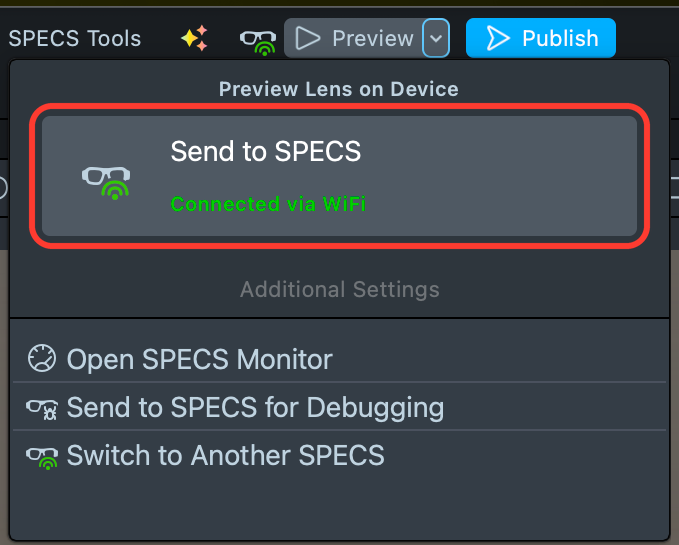
Lens Studio's toolbar is made of up of a collection of tools that allow you to configure your project's info, access various tools like Asset Library and Lens Studio AI, send your Lens to SPECS, and publish it.
Home
The Home button allows you to access the Home page, which provides quick access to your recent projects, sample projects, and other inspirational materials.
Asset Library
The Asset Library button allows you to access ready to use building blocks that you can use in your Lens. These building blocks are a great way to start or add on top of your Lens. They are made by the community, as well as from us.
Project Settings Tool
The Project Settings button allows you to configure project info associated with the Lens like the icon, Lens name and the main hint. For more information on project info, please refer to the Configuring Project Settings Guide.
Lens Studio AI
The Lens Studio AI button at the top left of Lens Studio opens the Lens Studio AI panel.
In a Snapchat project, the panel opens on Easy Lens, which builds a Lens from a description. Its sidebar also opens the GenAI Suite, which generates ML models and assets such as faces, styles and edits. See Panels.
Pair Your Device
The Preview Lens button sends your Lens to Snapchat on your paired devices for previewing. Its menu (the arrow) can send it to every paired Snapchat app, with Lens Profiler, or to Camera Kit. For more information on how to preview Lenses, please refer to the Pairing to Snapchat guide.
The Preview button's menu (the arrow) holds Preview Lens on Device, where the Send to SPECS card runs the Lens on your connected SPECS. For more information, see Connect Lens Studio to SPECS and Send a Lens to SPECS.
Publish
The Publish button lets you publish your Lens to Snapchat for the world to see.
My Lenses
Using this will open the My Lenses window. My Lenses provides you with access to analytics about Lenses you've publishes, way to publish to the Asset Library, and more.
The Publish button lets you publish your Lens to Lens Explorer on SPECS. See Publishing Your SPECS Lens.
SPECS Dev Portal
In a SPECS project, the SPECS Dev Portal menu takes the place of My Lenses. Select SPECS Dev Portal > Login to sign in to your SPECS developer account, which publishing and the GenAI tools need.
Keyboard shortcuts
You can speed up your workflow by using the keyboard to trigger commonly used commands.
Project Operations
Action
Mac
Windows
New Project
⌘+N
Ctrl+N
Open Project
⌘+O
Ctrl+O
Save
⌘+S
Ctrl+S
Save As
⌘+Shift+S
Ctrl+Shift+S
Reload Project
⌘+Shift+R
Ctrl+Shift+R
Open Home Window
⌘+W
Ctrl+W
Minimize Window
⌘+M
Ctrl+M
Edit Operations
Action
Mac
Windows
Undo
⌘+Z
Ctrl+Z
Redo
⌘+Shift+Z
Ctrl+Shift+Z
Copy (context-dependent)
⌘+C
Ctrl+C
Paste (context-dependent)
⌘+V
Ctrl+V
Duplicate (Multiple contexts)
⌘+D
Ctrl+D
Select All (Scene Hierarchy, Asset Browser, text fields, etc.)
⌘+A
Ctrl+A
Scene Hierarchy
Basic Operations
Action
Mac
Windows
Copy
⌘+C
Ctrl+C
Paste
⌘+V
Ctrl+V
Duplicate Object
⌘+D
Ctrl+D
Delete Object
Delete, Backspace
Delete, Backspace
Group Objects
⌘+G
Ctrl+G
Save as Prefab
⌘+Shift+P
Ctrl+Shift+P
Rename
Return
Return
Add New Object
⌘+Shift+N
Ctrl+Shift+N
Return to Scene from Prefab Preview
Escape
Escape
Select All
⌘+A
Ctrl+A
Toggle object visibility
Space
Space
Tab / Rename / Creation Behavior
Action
Mac
Windows
Navigate renaming to the next SceneObject in the hierarchy (when renaming)
Tab
Tab
Navigate renaming to the previous SceneObject in the hierarchy (when renaming)
Shift+Tab
Shift+Tab
Create child SceneObject (when no SceneObject is being renamed)
Tab
Tab
Create root SceneObject (when no SceneObject is being renamed)
Shift+Tab
Shift+Tab
Arrow-Key Navigation
Action
Mac
Windows
Iterate up in hierarchy
↑
↑
Iterate down in hierarchy
↓
↓
Collapse selected group (if the group is expanded)
←
←
Expand selected group (if the group is collapsed)
→
→
Iterate up in hierarchy (when selected group is collapsed)
←
←
Iterate down in hierarchy (when selected group is expanded)
→
→
Collapse first non-collapsed group in parent hierarchy (heuristic)
⌘+←
Ctrl+←
Expand first non-expanded group in child hierarchy (first child in each subtree)
⌘+→
Ctrl+→
Iterate through expanded SceneObjects by name starting with A–Z
A–Z
A–Z
Multi-Edit Behavior
When multiple SceneObjects are selected and you change a property in the Scene Hierarchy (for example, enable/disable, layer, etc.), the change is applied to all selected objects.
If you hold ⌘ / Ctrl while making the change, the change is applied only to the one you are directly editing.
Asset Browser
Asset Browser Shortcuts
Action
Mac
Windows
Copy
⌘+C
Ctrl+C
Paste
⌘+V
Ctrl+V
Duplicate
⌘+D
Ctrl+D
Delete
Delete, Backspace
Delete, Backspace
Create Folder
Tab
Tab
Import Asset
⌘+Shift+I
Ctrl+Shift+I
Group
⌘+G
Ctrl+G
Add New Resource
⌘+Shift+N
Ctrl+Shift+N
Rename
Return
Return
Select All
⌘+A
Ctrl+A
Arrow keys: Asset Browser uses similar up/down/left/right navigation patterns as Scene Hierarchy (iterating and opening/closing folders) where applicable.
Viewport & Scene Editor
Object Deletion & Duplication (Scene Viewport)
Action
Mac
Windows
Delete Selected Objects
Backspace
Backspace
Duplicate Objects
⌘+D
Ctrl+D
Camera Movement (Basic)
Action
Mac
Windows
Camera Forward
↑
↑
Camera Back
↓
↓
Camera Right
→
→
Camera Left
←
←
Home / Reset View
H
H
Zoom to Selection (frame selected object)
F
F
Viewport Tools (QWER + Unified)
Action
Mac
Windows
Selection Tool
Q
Q
Move Tool
W
W
Rotate Tool
E
E
Scale Tool
R
R
Unified Tool
Y
Y
Viewport Navigation (Mouse + Modifiers)
Action
Mac
Windows
Zoom In/Out
Scroll Up / Scroll Down
Scroll Up / Scroll Down
Zoom In/Out (Alt + Right Drag)
Opt + Right Mouse Drag
Alt + Right Mouse Drag
Pan
Space + Left Mouse Drag
Space + Left Mouse Drag
Pan (alt method)
Middle Mouse Drag
Middle Mouse Drag
Orbital Movement
Right Mouse Drag
Right Mouse Drag
Orbital Movement (alt method)
Opt + Left Mouse Drag
Alt + Left Mouse Drag
The Scene Editor supports flight-style camera navigation for faster, more intuitive movement. While holding the Right Mouse Button, you can use the keyboard to freely move the camera in 3D space:
Flight-Style Movement Controls
Action
Mac
Windows
Camera forward
Hold Right Mouse Button + W
Hold Right Mouse Button + W
Camera backward
Hold Right Mouse Button + S
Hold Right Mouse Button + S
Camera right
Hold Right Mouse Button + D
Hold Right Mouse Button + D
Camera left
Hold Right Mouse Button + A
Hold Right Mouse Button + A
Camera up
Hold Right Mouse Button + E
Hold Right Mouse Button + E
Camera down
Hold Right Mouse Button + Q
Hold Right Mouse Button + Q
Movement with higher speed
Hold Shift with any of the keys above
Hold Shift with any of the keys above
This mode is designed to feel similar to “flythrough” controls in game engines and other 3D tools. Try combining Shift with W/A/S/D/Q/E for fast navigation around complex scenes.
Selection (Scene Viewport)
Action
Mac
Windows
Select object (new selection)
Left Mouse Click
Left Mouse Click
Select multiple (selection rectangle)
Left Mouse Drag
Left Mouse Drag
Add to current selection
Shift + Left Mouse Click
Shift + Left Mouse Click
Toggle selection (add/remove from current selection)
⌘ + Left Mouse Click
Ctrl + Left Mouse Click
Preview
Reset Previews
Action
Mac
Windows
Reset all previews / refresh Lens (as long as at least one preview is visible)
⌘+R
Ctrl+R
Preview Navigation (Interactive Mode)
WASD / Vertical
Action
Mac
Windows
Move Forward
W
W
Move Back
S
S
Move Right
D
D
Move Left
A
A
Move Up
E
E
Move Down
Q
Q
Arrow Keys Movement
Action
Mac
Windows
Move Forward
↑
↑
Move Back
↓
↓
Move Right
→
→
Move Left
←
←
Look / Orientation (Shift + WASD/EQ)
Action
Mac
Windows
Look Down
Shift + W
Shift + W
Look Up
Shift + S
Shift + S
Look Left
Shift + D
Shift + D
Look Right
Shift + A
Shift + A
Positive Roll
Shift + E
Shift + E
Negative Roll
Shift + Q
Shift + Q
Camera Look & Zoom
Action
Mac
Windows
Look Around
Right Mouse Drag
Right Mouse Drag
Look Around (alt method)
Opt + Left Mouse Drag
Alt + Left Mouse Drag
Zoom In/Out
⌘ + Scroll Up / Scroll Down
Ctrl + Scroll Up / Scroll Down
Increase/Decrease Movement Speed
Shift + Scroll Up / Scroll Down
Shift + Scroll Up / Scroll Down
Help & Debug
Help & Debug Shortcuts
Action
Mac
Windows
Report an Issue
F8
F8
Text Editing (Code Editor)
Script Editor Shortcuts
Action
Mac
Windows
Undo
⌘+Z
Ctrl+Z
Redo
⌘+Shift+Z
Ctrl+Shift+Z
Save File Changes (saves current script file)
⌘+S
Ctrl+S
With the Monaco-based Script Editor, most Visual Studio Code shortcuts should also work (multi-cursor, selection, navigation, etc.).
When the Script Editor is focused, ⌘+S / Ctrl+S saves only the script, not the Lens project.
Inspector—Float & Integer Fields
Float Fields
Action
Mac
Windows
Increase / Decrease by default step
↑ / ↓
↑ / ↓
Increase / Decrease by default step ×10
⌘ + ↑ / ↓
Ctrl + ↑ / ↓
Increase / Decrease by 0.01
Opt + ↑ / ↓
Alt + ↑ / ↓
Increase / Decrease by 0.1
⌘ + Opt + ↑ / ↓
Ctrl + Alt + ↑ / ↓
Increase / Decrease by 1.0
Shift + ↑ / ↓
Shift + ↑ / ↓
Increase / Decrease by 10.0
⌘ + Shift + ↑ / ↓
Ctrl + Shift + ↑ / ↓
Integer Fields
Action
Mac
Windows
Increase / Decrease by default step
↑ / ↓
↑ / ↓
Increase / Decrease by default step ×10
⌘ + ↑ / ↓
Ctrl + ↑ / ↓
Inspector—Link Fields
Link Field Interactions
Action
Mac
Windows
Open Entity Picker for the field
Left Mouse Click on the field
Left Mouse Click on the field
Open context menu
Right Mouse Click on the field
Right Mouse Click on the field
Select the linked object
Shift + Left Mouse Click on the field
Shift + Left Mouse Click on the field
Open editor for the linked object
⌘ + Shift + Left Mouse Click on the field
Ctrl + Shift + Left Mouse Click on the field
Additional Inspector / Hierarchy Shortcuts
Scene Object Inspector—Spinbox
Action
Mac
Windows
Drag to change spinbox value (adjust speed with modifiers)
Left Click spinbox buttons + Drag(hold ⌘ to slow, Shift to speed up)
Left Click spinbox buttons + Drag(hold Ctrl to slow, Shift to speed up)