SnapML on SPECS
Train a custom object detection model, quantize it to W8A8 and convert it to Qualcomm DLC, then run it with SnapML on SPECS.
- Snapchat: not supported
- SPECS: partially supported
- Camera Kit Web: not supported
- Camera Kit Mobile: not supported
- SnapchatNot supported
- SPECSPartially supported
- Models run on device only after W8A8 quantization and conversion to Qualcomm DLC, and DLC models don't run in Lens Studio Preview
- Camera Kit WebNot supported
- Camera Kit MobileNot supported
SnapML runs machine learning models in SPECS Lenses, for computer vision, object detection, and more. This guide walks through a generalized workflow to train a custom object detection model with Paperspace and Roboflow, prepare it for SPECS, and use it in a Lens. It builds on the workflow used for Snapchat Lenses, described in SnapML Overview.
What a SnapML model needs on SPECS 27
On SPECS 27, a SnapML model must be:
- Quantized to W8A8: 8-bit weights and 8-bit activations.
- Converted to Qualcomm's DLC format, with Qualcomm's AI tooling. The final conversion to DLC currently relies on internal Snap tooling: hand your quantized TFLite model to the SPECS Developer Team, who convert it for you.
The conversion route is: Float32 ONNX → TFLite → quantized TFLite (W8A8) → DLC. DLC models currently run only on SPECS, not in Lens Studio, so test them on the device.
For a complete example with Lens Studio scripts, see the
SnapML Starter sample
in the Spectacles (2024) samples repository on GitHub. It ships an ONNX model (Monitor.onnx) made
for Spectacles (2024); on SPECS 27, replace it with your DLC model.
How the SnapML workflow for SPECS fits together
This workflow adapts the Multi-Object Detection template from the SnapML templates repository, using cloud-based development environments and specialized tools for managing datasets and training. It has these phases:
- Setup: prepare your development environment in Paperspace.
- Data preparation: manage and export your dataset with Roboflow.
- Training: train a custom YOLOv7 model on your dataset.
- Export: export the trained model to ONNX for SnapML.
- Quantization: convert the ONNX model to TFLite and quantize it to W8A8.
- Conversion: have the quantized model converted to DLC.
- Deployment: import the DLC model into Lens Studio and test it on SPECS.
This guide uses Paperspace and Roboflow for instruction only: Snap doesn't endorse these services, and any alternatives that provide similar functionality work.
Model training workflow
At a glance, the steps are: set up Paperspace → prepare the dataset → set up YOLOv7 → train the model → export to ONNX → quantize to W8A8 TFLite → convert to DLC → import into Lens Studio.
Quick start for experienced ML developers
If you're familiar with machine learning workflows, here's the condensed version of the steps:
# 1. Set up environment in Paperspace with PyTorch template
git clone https://github.com/Snapchat/snapml-templates.git
git clone https://github.com/hartwoolery/yolov7
cd yolov7
pip install -r requirements.txt

# 2. Download dataset from Roboflow in YOLOv7 format
pip install --upgrade roboflow
# Use Roboflow API to download your dataset

# 3. Download pre-trained weights
wget https://github.com/WongKinYiu/yolov7/releases/download/v0.1/yolov7-tiny.pt

# 4. Train model
python train.py --data your-dataset/data.yaml --cfg cfg/training/yolov7-tiny.yaml \
  --weights yolov7-tiny.pt --img 224 224 --batch-size 64 --epochs 200 \
  --name detection --device 0 --hyp data/hyp.scratch.tiny.yaml

# 5. Export to ONNX for SnapML
python export.py --weights runs/train/detection/weights/best.pt --grid \
  --simplify --export-snapml --img-size 224 224 --max-wh 224

# 6. Convert the ONNX model to TensorFlow, then quantize it to a W8A8 TFLite model
onnx2tf -i runs/train/detection/weights/best.onnx -o saved_model/
# See "Quantize the model to W8A8 TFLite" for the quantization script

# 7. Hand the W8A8 TFLite model to the SPECS Developer Team for conversion to DLC

# 8. Import the DLC model into Lens Studio and set up class labels
# See the detailed steps that follow
The rest of this guide walks through each step in detail, with the concepts behind it and troubleshooting tips.
Accounts you need before you start
- A Paperspace account, or any alternative cloud-based development environment.
- A Roboflow account for managing and annotating datasets, or any alternative dataset management tool.
Why this workflow?
| Traditional ML workflow | SnapML workflow |
|---|---|
| Complex environment setup on a local machine | Cloud-based development with pre-configured templates |
| Manual dataset preparation and augmentation | Automated dataset management with Roboflow |
| Full model training from scratch | Transfer learning with pre-trained weights |
| Custom conversion steps for each device | Export to ONNX, then quantize to W8A8 TFLite and convert to DLC |
| Custom integration with AR platforms | Integration with Lens Studio sample scripts |
Steps to train and prepare a SnapML model for SPECS
1. Set up a Paperspace environment
Paperspace provides a cloud-based environment with the GPU power that training machine learning models needs.
-
Sign up for an account. When you sign up, select Gradient as your product (not Core): it provides a fully managed JupyterLab notebook interface with GitHub integration.
-
Select a template. For YOLOv7 PyTorch notebooks, choose the PyTorch 1.12 template, which includes most of the dependencies you need.
-
Choose the hardware. Select a GPU option for faster training: free CPU options are available, but first come, first served. The P4000 or higher GPU options are recommended.
-
Clone the SnapML templates repository:
git clone https://github.com/Snapchat/snapml-templates.git -
Go to the Multi-Object Detection folder and open its notebook file (
.ipynb). The notebook contains the code for the whole training workflow.
When your Paperspace machine stops, your work environment is wiped, and you need to re-run all the notebook steps when you restart. Save important outputs, such as trained models and ONNX files, to persistent storage or download them to your computer.
Restart kernel: Refreshes only your Python environment without losing installed packages or files
Restart space: Completely resets your environment to its default state
After doing a %pip install in your notebook, typically you
only need to restart the kernel using the JupyterLab interface.
2. Prepare your dataset with Roboflow
Roboflow helps you prepare, annotate, and export datasets for machine learning models: it labels, augments, and exports your dataset in the format your framework needs.
-
Create or sign in to your Roboflow account at Roboflow. You can sign up with GitHub, Google, or email.
-
Prepare your dataset, in one of two ways:
- Create your own dataset: upload your images to Roboflow, label the objects with Roboflow's annotation tools, and apply augmentation to expand the dataset.
- Use an existing dataset: browse Roboflow Universe for public datasets, search for ones that match what you want to detect, and fork them to your workspace.
-
Export your dataset in YOLOv7 format: on your project page in Roboflow, select Download this Dataset, select the YOLO v7 PyTorch format, and copy the code snippet it provides into your notebook. It looks like this:
# Install Roboflow package
pip install --upgrade roboflow

from roboflow import Roboflow
rf = Roboflow(api_key="YOUR_API_KEY_HERE")

# Point at your workspace
project = rf.workspace("workspace-name").project("project-name")

# Pick the version
version = project.version(1)

# Download in the format you need
dataset = version.download("yolov7")

# Save the dataset location
DATASET_DIR = dataset.location
print(DATASET_DIR)
If the dataset isn't public:
- In the Roboflow web app, go to Universe and find your dataset.
- Select Fork to copy it to your workspace.
- Create a version, following the guided steps.
- Get your API key from Settings > Private Key.
For optimal results when training object detection models:
Include at least 100 images per class for basic detection
Ensure diversity in lighting conditions, angles, and backgrounds
Include images with multiple objects and partial occlusions
Use Roboflow's augmentation features to expand your dataset:
- Rotation
- Brightness adjustments
- Noise addition
- Mosaic (combining images)
3. Set up YOLOv7 for training
YOLOv7 is an object detection algorithm known for its speed and accuracy, which suits mobile and wearable devices like SPECS. For SnapML, this guide uses a modified version that supports the export format SnapML needs.
-
Clone the modified YOLOv7 repository. This fork of YOLOv7 adds the
--export-snapmlexport option on itsmainbranch:cd ~git clone https://github.com/hartwoolery/yolov7cd yolov7pip install -r requirements.txtThe fork changes how the model is exported so that it works with SnapML: the export leaves out the NMS layer, so that NMS can run in a Lens script instead.
-
Set the path to your dataset directory, so that the training script can find the dataset you downloaded from Roboflow:
# Set the version number to match your downloaded datasetVERSION_NUMBER = 1# Build the path to your datasetDATASET_DIR = f"/root/yolov7/your-dataset-name-{VERSION_NUMBER}"print("Loading from", DATASET_DIR) -
Download the pre-trained weights, which speed up training through transfer learning:
cd ~/yolov7wget https://github.com/WongKinYiu/yolov7/releases/download/v0.1/yolov7-tiny.ptYOLOv7-tiny benefits Full YOLOv7 benefits Smaller model size (about 5–6 MB) Higher detection accuracy Faster inference Better performance with small objects Lower memory requirements More robust in challenging environments Optimal for mobile and wearable devices Better for complex scenes
Pre-trained weights are parameter values saved after a model has been trained on a large dataset like COCO (Common Objects in Context), which contains over 330,000 images with 80 object categories. Using these weights for transfer learning offers several advantages:
- Faster convergence: Training starts from an optimized state rather than random initialization
- Better performance: The model leverages patterns and features already learned from a larger dataset
- Less data needed: You can achieve good results with a smaller custom dataset
- Reduced overfitting: The model has already learned generalizable features
Transfer learning works by:
- Starting with weights pre-trained on a large dataset
- Replacing the final classification layer with your custom classes
- Fine-tuning the entire network or just later layers with your data
For wearable devices like SPECS, the smaller yolov7-tiny variant is recommended for real-time inference.
YOLOv7 offers several advantages for SPECS:
| Feature | YOLOv7 | Older YOLO Versions | Other Models (SSD, R-CNN) |
|---|---|---|---|
| Speed | ★★★★★ | ★★★★☆ | ★★★☆☆ |
| Accuracy | ★★★★☆ | ★★★☆☆ | ★★★★★ |
| Size | ★★★★☆ | ★★★★★ | ★★☆☆☆ |
| SnapML Compatibility | ★★★★★ | ★★★☆☆ | ★★★☆☆ |
YOLOv7 strikes an optimal balance between accuracy and performance for AR applications.
4. Train your model
Train your custom model on your dataset, starting from the pre-trained weights. Training is the most computationally intensive part of the process: it takes from minutes to hours, depending on your dataset size and hardware.
-
Optional: set up TensorBoard to visualize training metrics in real time, so you can monitor progress and spot issues early:
# In a notebook environment:# %reload_ext tensorboard# %tensorboard --logdir runs/train# In a terminal:tensorboard --logdir runs/train -
Configure and start training. This is the core training command, with its key parameters explained:
import osos.environ['WANDB_MODE'] = 'disabled' # Disable Weights & Biases logging# Key training parametersEPOCH = 200 # Total number of training epochsBATCH_SIZE = 64 # Number of images processed at onceIMG_SIZE = 224 # Input image resolution (height, width)JOB_NAME = 'detection' # Name for this training run# Change directory to yolov7 folder# In terminal: cd ~/yolov7# Run the training commandpython train.py \--data your-dataset-name-1/data.yaml \ # Path to dataset configuration--cfg cfg/training/yolov7-tiny.yaml \ # Model architecture--weights yolov7-tiny.pt \ # Pre-trained weights--img 224 224 \ # Input resolution--batch-size 64 \ # Batch size--epochs 200 \ # Number of epochs--name detection \ # Run name--device 0 \ # GPU device (0 = first GPU)--hyp data/hyp.scratch.tiny.yaml # Hyperparameters- Start small: begin with fewer epochs (for example, 50) to test your setup.
- Adjust the batch size: reduce it if you run into memory errors.
- Image size: 224×224 balances detection quality and speed on a device.
- Monitor early: check TensorBoard after about 10 epochs to make sure training is progressing.
-
Read the training output. During training, the console shows lines like this:
Epoch gpu_mem box obj cls total labels img_size0/199 0.367G 0.07126 0.3772 0 0.4485 188 224Epoch: Current training epoch / total epochs
gpu_mem: GPU memory usage
box: Bounding box regression loss (lower = better localization)
obj: Objectness loss (detecting if there's any object)
cls: Classification loss (which class the object belongs to)
total: Sum of all losses (main training metric to reduce)
labels: Number of ground truth objects in the batch
img_size: Input image resolution
Look for decreasing loss values as training progresses. Plateauing loss indicates the model may have converged.
-
Test your trained model on sample images:
# Run detection on test imagespython detect.py \--img-size $IMG_SIZE \--weights runs/train/detection/weights/best.pt \--conf 0.5 \ # Confidence threshold--source your-dataset-name-1/test/images # Test images -
Display the detection results to evaluate your model's performance:
# In notebook environments: %matplotlib inlinefrom glob import globfrom PIL import Imagefrom IPython.display import display# Find your latest detect output folderexp_dirs = sorted(glob('runs/detect/exp*'))latest = exp_dirs[-1]# Display detection resultspaths = glob(f'{latest}/*.*')img = Image.open(paths[0])display(img)
When reviewing your model results, consider:
False Positives: Detections where no object exists
False Negatives: Missed objects that should be detected
Localization Accuracy: How precisely the bounding boxes fit around objects
Classification Accuracy: Whether objects are assigned the correct class
If performance is poor, consider:
- Adding more training data
- Increasing training epochs
- Adjusting model hyperparameters
- Using data augmentation to increase dataset diversity
5. Export the model to ONNX for SnapML
Export the trained model to ONNX (Open Neural Network Exchange), an open standard for representing machine learning models that works across frameworks. The ONNX model is the starting point for the W8A8 TFLite model SPECS needs.
-
Install the dependencies for ONNX export:
# Install dependencies for ONNX exportpip install "protobuf<4.21.3"pip install "onnx>=1.9.0"pip install onnx-graphsurgeonpip install --user "onnx-simplifier>=0.3.6" -
Run the export script with these flags:
# Run export script for SnapML compatibilitypython export.py \--weights ./runs/train/detection/weights/best.pt \ # Path to trained weights--grid \ # Export detection grid--simplify \ # Simplify ONNX graph--export-snapml \ # Special flag for SnapML compatibility--img-size 224 224 \ # Input dimensions (use your IMG_SIZE)--max-wh 224 # Maximum width/height (use your IMG_SIZE)The
--export-snapmlflag matters: it leaves box decoding and NMS (Non-Maximum Suppression) out of the ONNX graph. A Lens script runs them instead (in the SnapML Starter sample,MLController.jsandYOLODetectionProcessor.tsdo). -
Generate download links for the exported model:
from IPython.display import FileLink, FileLinks# Link to the ONNX filedisplay(FileLink('runs/train/detection/weights/best.onnx'))# Or browse the entire weights folderdisplay(FileLinks('runs/train/detection/weights')) -
Generate the class labels, in class index order, for the Lens Studio scripts:
import yamlwith open("your-dataset-name-1/data.yaml", "r") as stream:data = yaml.safe_load(stream)for i, label in enumerate(data["names"].values() if isinstance(data["names"], dict) else data["names"]):print(f'"{i}":"{label}",')Example output:
"0":"chair","1":"monitor","2":"tv",Keep this list: in Lens Studio, you enter the labels in this order, so that each class index gets its label (see Import and test your model in Lens Studio).
The exported ONNX model has several key attributes that make it suitable for SnapML:
Simplified Graph: The
--simplifyflag optimizes the model by removing redundant operationsFixed Input Size: The input dimensions are fixed during export, matching what you'll use in Lens Studio
No NMS: Non-Maximum Suppression is excluded, so a Lens script can run it with full control
Quantization: Not applied at export. SPECS needs a W8A8-quantized model, which the next step produces
6. Quantize the model to W8A8 TFLite
These steps convert the trained float32 model into a W8A8-quantized TFLite model, ready for the
conversion to DLC. You need TensorFlow and onnx2tf installed.
-
Convert the ONNX (float32) model to a TensorFlow SavedModel with
onnx2tf, which handles the NCHW→NHWC layout flip TFLite needs:onnx2tf -i model.onnx -o saved_model/The alternative,
onnx-tf convert, is older and keeps NCHW, which causes more layout problems. -
Convert the SavedModel to a float32 TFLite model. This baseline confirms the graph converts before you add quantization:
converter = tf.lite.TFLiteConverter.from_saved_model("saved_model/")open("model_fp32.tflite", "wb").write(converter.convert()) -
Build a representative dataset to calibrate the activation ranges: a generator that yields about 100–500 real inputs, shaped
[1, H, W, C]and preprocessed exactly as in training and inference:def rep_data():for img in calib_images[:200]:yield [preprocess(img).astype("float32")] # NHWC, same normalization as training -
Convert with W8A8 full-integer quantization, continuing with the converter from step 2:
converter.optimizations = [tf.lite.Optimize.DEFAULT]converter.representative_dataset = rep_data# Forces int8; errors if any op can't quantizeconverter.target_spec.supported_ops = [tf.lite.OpsSet.TFLITE_BUILTINS_INT8]# Keeps I/O integer end-to-endconverter.inference_input_type = tf.int8converter.inference_output_type = tf.int8open("model_w8a8.tflite", "wb").write(converter.convert()) -
Verify the result: load it with
tf.lite.Interpreter, check thatget_input_details()reports theint8data type with quantization parameters, and compare its outputs with the float32 baseline to confirm the accuracy drop is acceptable.
- Weights-only ("dynamic range") quantization: if you set
optimizationsbut provide no representative dataset, you get int8 weights with float activations (W8Afloat), not W8A8. - Layout: TFLite prefers NHWC.
onnx2tfhandles this cleanly; theonnx-tfroute often adds unnecessary transpose ops or layout mismatches.
7. Convert the quantized model to DLC
The final conversion, from the W8A8 TFLite model to Qualcomm's DLC format, currently relies on
internal Snap tooling. Hand your model_w8a8.tflite to the SPECS Developer Team, who convert it to
DLC for you.
8. Use your model in Lens Studio
Import the DLC model into Lens Studio for use in your SPECS Lens.
-
Open the SnapML Starter sample, or create a new Lens Studio project.
-
Consider the input range your model accepts. Exported models typically expect inputs from 0 to 1, while the texture input of the ML Component in Lens Studio takes values from 0 to 255. When you bring the model into Lens Studio, set each input channel's Scale to
0.0039215(1/255) and its Bias to 0:Channel Scale Bias Channel 0 0.0039215 0.00 Channel 1 0.0039215 0.00 Channel 2 0.0039215 0.00 For more on importing models, see the ML Model Import section of ML Component Overview.
-
Replace the default model: in the Asset Browser, right-click the default ML model, select Replace From File…, and select your DLC model.
-
Set up your class labels: in the Inspector, enter your labels, in class index order, in the detection script's class list (the
classSettingsinput of the sample'sMLController.js, or theclassLabelsinput ofMLSpatializer). -
Configure the model parameters: match the input dimensions to your training settings, set the confidence (score) threshold to suit your model, and try different NMS (IoU) threshold values.
-
Send your Lens to SPECS to test it, because DLC models don't run in Lens Studio Preview (see Send a Lens to SPECS). Evaluate the real-world performance, adjust, and optimize if detection is too slow.
To optimize your ML model's performance on SPECS:
Reduce inference frequency if full frame rate isn't necessary
Apply region of interest (ROI) to limit processing to specific areas
Implement caching for stable detections
Limit tracking to a reasonable number of objects (e.g., 3-5 most confident detections)
Apply temporal smoothing to reduce jitter in detections
Advanced SnapML topics
Understanding Non-Maximum Suppression (NMS)
The --export-snapml export flag changes how Non-Maximum Suppression (NMS) is handled:
NMS is not a trainable convolutional layer but a deterministic post-processing step applied to raw box predictions during inference. Its purpose is to:
- Collect all predicted boxes whose confidence (objectness × class score) exceeds your threshold
- Sort those boxes by confidence (highest to lowest)
- Keep only the best boxes by removing highly overlapping detections of the same object
When exporting a YOLO model for SnapML, we exclude NMS from the graph and run it in a Lens script. This gives more control over the detection process. Lens scripts can also call the native TensorMath.applyNMS.
Optimize a model for SPECS
When you create models for SPECS, consider these strategies:
- Use smaller variants, like YOLOv7-tiny, for real-time performance.
- Reduce the input image size to balance detection quality and speed.
- Limit the number of classes to make the model more efficient.
- Quantize to W8A8, which SPECS requires.
- Test thoroughly on SPECS to make sure inference runs in real time.
Troubleshooting SnapML training and export
Common issues and solutions
Restarting the kernel: Clears Python state without affecting installed packages or data files. Use after installing libraries with
%pip install.Restarting the space: Performs a full reset of your environment, including all files and installations. Only use when something at the system level has gone wrong.
If you encounter GPU memory errors during training:
- Reduce the batch size
- Use a smaller model variant
- Reduce image resolution
Free up memory between operations with
torch.cuda.empty_cache()
Common export issues:
Ensure all required packages are installed at the correct versions
When using
--simplify, ensure you haveonnx-simplifierinstalledFor protobuf-related errors, try installing a specific version with
pip install protobuf==3.20.3
Frequently asked questions about SnapML on SPECS
For optimal performance on SPECS, prioritize models with:
Small size: Under 10MB for better loading times and memory usage
Low computational requirements: Models with fewer operations per inference
W8A8 quantization: 8-bit weights and activations, which SPECS requires and which reduces the memory footprint
Simple architectures: Fewer layers and simpler operations are more efficient
YOLOv7-tiny and MobileNet-based architectures are particularly well-suited for SPECS.
SnapML can technically detect as many objects as are present in the frame, but for performance reasons on SPECS:
Recommended: Limit detection to 3-5 objects simultaneously
Maximum: Up to 10 objects can be detected with adequate performance
Performance impact: More tracked objects require more processing power
You can control this by adjusting the NMS threshold and maximum objects parameters in your Lens Studio implementation.
To improve detection accuracy:
Increase training data: More diverse images of your target objects
Better annotations: More precise bounding boxes
Data augmentation: Apply transforms to increase dataset variability
Longer training: Try increasing the number of epochs
Model fine-tuning: Adjust hyperparameters like learning rate
Post-processing: Implement temporal smoothing and confidence thresholds
Yes. While this guide focuses on object detection, SnapML supports various model types:
Image classification: Identify what's in an image
Semantic segmentation: Identify each pixel's category
Style transfer: Apply artistic styles to images
Pose estimation: Track human body positions
The export process differs slightly, but the Paperspace and Lens Studio workflow stays similar, and the model still goes through W8A8 quantization and DLC conversion.
Resources for training SnapML models
- SnapML Templates GitHub Repository
- YOLOv7 GitHub Repository
- Roboflow Documentation
- SnapML Overview: the SnapML documentation on this site.
What the training workflow gives you
Machine learning opens up new possibilities for AR interaction in SPECS experiences. By following this workflow, you've trained a custom object detection model and prepared it for SPECS with SnapML.
Cloud-based training environments like Paperspace, dataset management tools like Roboflow, and the export, quantization, and conversion steps for SnapML make it possible to build sophisticated machine learning features without extensive ML expertise.
As you continue developing for SPECS, experiment with different model architectures, datasets, and detection parameters to make your AR experiences more engaging and responsive.
Use a SnapML model in a SPECS Lens
Once you have your DLC model, the next step is to use it in Lens Studio for SPECS. This section covers the workflow from importing the model to writing custom logic for your AR experience. To follow along, open the SnapML Starter sample.
Scripts in the SnapML Starter sample
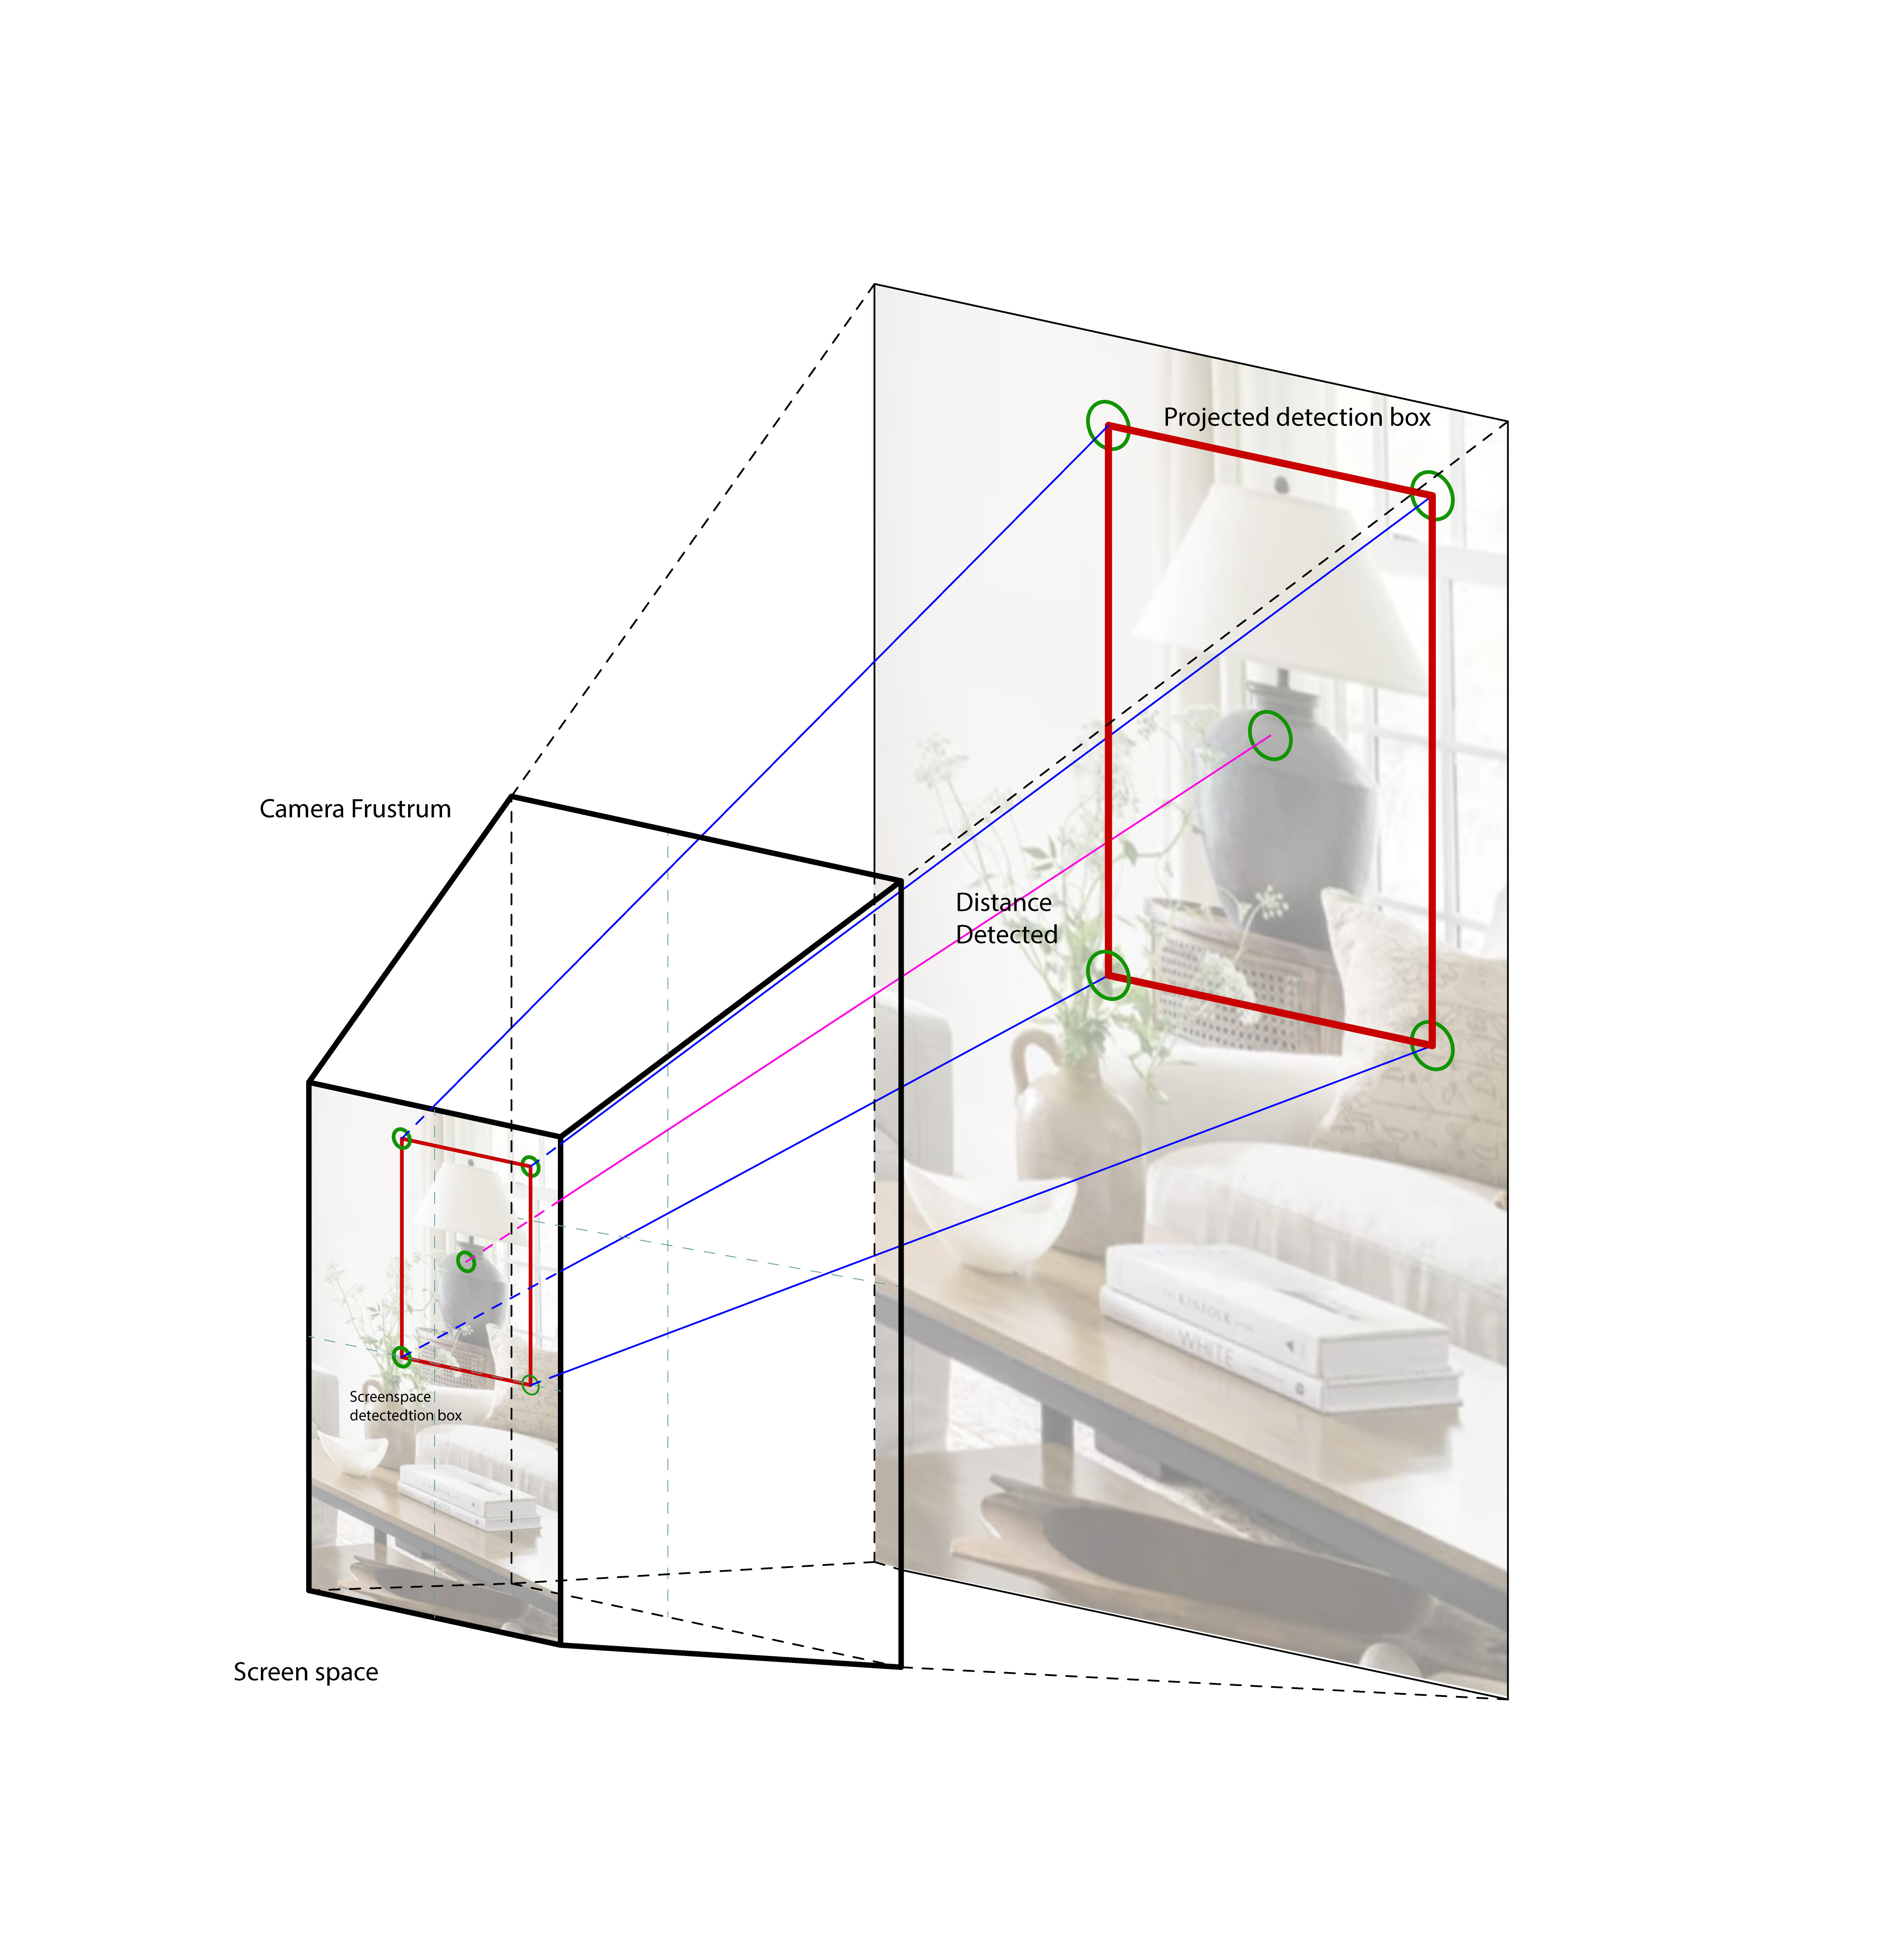
The SnapML Starter sample's scripts work together in three groups:
-
Core detection components
MLSpatializer: the main entry point, which connects ML detection with 3D space.YOLODetectionProcessor: turns the raw model outputs into usable detections.DetectionContainerandDebugVisualizer: show a detection's category, confidence, and distance, and visualize points for debugging.
-
Camera and spatial awareness
PinholeCapture: interfaces with the device camera.PinholeCameraModel: the mathematical model for 2D to 3D conversions.
-
Positioning and transformation
MatchTransformandMatchTransformLocal: position objects relative to others.InBetween: calculates positions between two objects.SmartTether: positions an object based on the user's movement.
The following sections show how these components work together in Lens Studio.
Import and test your model in Lens Studio
-
Import your model:
- Open the SnapML Starter sample in Lens Studio.
- In the Asset Browser, select + > Import Files, then select your DLC model.
- Replace the default model in the project with the model you imported.
If your model exceeds the Lens size limit, reduce its size before conversion, for example with a smaller model variant or a smaller input size.
-
Configure the detection script. Select the object with the
MLSpatializerscript in the Scene Hierarchy, and in the Inspector setmodelto your imported model andinputTextureto the device camera texture. AdjustscoreThresholdto your model's confidence output andiouThresholdfor Non-Maximum Suppression. These are the inputs the sample declares:// From MLSpatializer.ts in the SnapML Starter sample (some hints shortened)@input@hint("ONNX model asset")model: MLAsset@input@hint("Input texture for the model (Device Camera Texture)")inputTexture: Texture@input@hint("Maximum number of objects to detect and place")@widget(new SliderWidget(1, 20, 1))maxDetectionCount: number = 5@input@hint("Score threshold for detections (0-1) - Lower values make it more sensitive to detections")@widget(new SliderWidget(0, 1, 0.01))scoreThreshold: number = 0.2@input@hint("IOU threshold for non-maximum suppression (0-1)")@widget(new SliderWidget(0, 1, 0.01))iouThreshold: number = 0.5@input@hint("Class labels")classLabels: string[] = ["Chair", "Table", "Sofa"] -
Test that your model detects objects before you add spatial features. The sample's
MLController.jsscript triggers itsonDetectionsUpdatedevent with each frame's detections. Each detection has alabel, ascore, anindex, and abbox(x, y, width, height in screen space, x and y at the box's center). From another script:// @input Component.ScriptComponent mlControllerscript.mlController.onDetectionsUpdated.add(function (detections) {print('Detected ' + detections.length + ' objects');for (let i = 0; i < detections.length; i++) {const detection = detections[i];print('Class: ' +detection.label +', Score: ' +detection.score.toFixed(2) +', Box: [' +detection.bbox.join(', ') +']');}}); -
Check your class labels: the labels you entered (
classLabelsonMLSpatializer, orclassSettingsonMLController.js) must be in class index order, as generated in Export the model to ONNX for SnapML. A class without a label is reported asclass_<index>.
Common issues when importing models and their solutions:
Model Not Loading: Verify that the model is the DLC conversion of a model exported with the
--export-snapmlflagNo Detections in Preview: DLC models run only on SPECS; send the Lens to SPECS to test
Detection Failures: Check that your input image size matches what the model expects
Poor Accuracy: Adjust the
scoreThresholdto better match your model's confidence outputMemory Issues: If experiencing crashes, try using a smaller model like YOLOv7-tiny
Map 2D detections to 3D space with the MLSpatializer script
Spatialization maps 2D image detections to 3D world space, so AR content can interact with real-world objects.
-
The role of
MLSpatializer.MLSpatializeris the central script that runs the detection and spatialization pipeline. On each update, it decodes the model outputs into detections withYOLODetectionProcessor, filters them, and triggers itsonDetectionsUpdatedevent:// From MLSpatializer.ts in the SnapML Starter sample// Process YOLO outputsconst detections = this.yoloProcessor.parseYolo7Outputs(this.outputs)// Filter detections based on center thresholdconst filteredDetections = this.filterDetectionsByCenter(detections)this.onRunningFinished(filteredDetections) -
From 2D to 3D: PinholeCapture and PinholeCameraModel. These components translate 2D image coordinates to 3D world space.
PinholeCameraModelhasprojectToUV,projectToPixel,unprojectFromUV,unprojectFromPixel,resize, andcrop.PinholeCaptureuses it to turn a point in the camera capture, at a given depth, into a world position:// From PinholeCapture.ts in the SnapML Starter samplecaptureToWorldTransform(captureUV: vec2, depth: number): vec3 {if (!this.isReady() || !this.viewToWorld) {this.logMessage("Error: PinholeCapture not ready for captureToWorldTransform")return new vec3(0, 0, 0)}const capturePos = this.cameraModel.unprojectFromUV(captureUV, depth)const viewPos = this.cameraDevice.pose.multiplyPoint(capturePos)const worldPos = this.viewToWorld.multiplyPoint(viewPos)return worldPos} -
YOLODetectionProcessor: making sense of model outputs. This processor converts the model's raw output tensors into structured detections, then applies Non-Maximum Suppression. Its entry point is:
// From YOLODetectionProcessor.ts in the SnapML Starter samplepublic parseYolo7Outputs(outputs: OutputPlaceholder[]): Detection[]
Coordinate systems to keep apart:
- Image space: 2D coordinates (x, y), where (0,0) is the top-left of the image.
- Screen space: 2D normalized coordinates, where (0,0) is the bottom-left and (1,1) the top-right.
- World space: 3D coordinates (x, y, z) in the AR scene.
The conversion from 2D to 3D relies on these key mathematical concepts:
- Pinhole Camera Model: Represents how 3D points are projected onto a 2D image plane
- Ray Casting: Projects a ray from the camera through the 2D detection point
- Intersection Testing: Determines where this ray intersects with surfaces in the real world
- Transformation Matrices: Converts between different coordinate systems
The PinholeCameraModel class encapsulates these calculations and exposes them through helper methods.
Smooth detections for a stable user experience
Raw ML detections can be jittery and unstable. Smoothing stabilizes where objects are placed, which makes AR experiences feel more natural. These examples illustrate the techniques; they aren't the sample's exact code.
-
Motion smoothing with MatchTransform.
MatchTransforminterpolates between positions, rotations, and scales:// Example usage of MatchTransform@componentexport class MatchTransformTS extends BaseScriptComponent {@inputtarget!: SceneObject; // Object to match@inputusePositionLerp: boolean = true; // Enable smooth transitions@inputpositionLerpSpeed: number = 1.0; // Lower = smoother but slower// Implementationupdate() {if (this.usePositionLerp) {// Smooth position transition with lerpconst currentPos = this.getSceneObject().getTransform().getLocalPosition();const targetPos = this.target.getTransform().getLocalPosition();// Calculate interpolated positionconst newPos = vec3.lerp(currentPos,targetPos,Math.min(1.0, this.positionLerpSpeed * getDeltaTime()));this.getSceneObject().getTransform().setLocalPosition(newPos);}}} -
Temporal filtering. Filtering positions over time reduces jitter. For example, smooth more for small movements than for large ones:
// Excerpt from a temporal filtering implementationupdateObjectPosition(index: number, newPosition: vec3, detection: Detection): void {// If we have a previous position, apply temporal smoothingif (this.previousPositions[index]) {// Calculate how much change is acceptableconst moveThreshold = this.calculateMoveThreshold(detection);// If movement is small enough, apply smoothingif (this.getDistance(newPosition, this.previousPositions[index]) < moveThreshold) {// Apply heavier smoothing when movement is smallnewPosition = vec3.lerp(this.previousPositions[index],newPosition,0.3 // Lower value = more smoothing);} else {// Less smoothing for large movementsnewPosition = vec3.lerp(this.previousPositions[index],newPosition,0.7);}}// Update the position and store for next framethis.setObjectPosition(index, newPosition);this.previousPositions[index] = newPosition;} -
Position stabilization with InBetween.
InBetweencalculates intermediate positions between objects:// Using InBetween for stable positioning@componentexport class InBetween extends BaseScriptComponent {@inputtarget1!: SceneObject; // First reference object@inputtarget2!: SceneObject; // Second reference object@inputpositionBlend: number = 0.5; // Weight between targets (0.5 = halfway)update() {if (!this.target1 || !this.target2) return;// Get positionsconst pos1 = this.target1.getTransform().getWorldPosition();const pos2 = this.target2.getTransform().getWorldPosition();// Calculate weighted positionconst blendedPosition = vec3.lerp(pos1, pos2, this.positionBlend);// Apply positionthis.getSceneObject().getTransform().setWorldPosition(blendedPosition);}}
- Adaptive smoothing: smooth small movements more and large ones less.
- Confidence-based smoothing: the higher a detection's confidence, the less smoothing it needs.
- Distance-based parameters: adjust smoothing by the object's distance from the camera.
- Frame history: use several previous frames, not only the most recent one.
- MatchTransform: Best for general-purpose movement smoothing
- MatchTransformLocal: When you need smoothing in local space rather than world space
- InBetween: For positioning objects relative to two reference points
- SmartTether: When you want content to follow the user with intelligent repositioning
Each component has specific strengths that make it suitable for different scenarios.
Build custom logic on SnapML detections
Once detection and spatialization work, build the logic for your AR experience. These examples
illustrate patterns; the helper functions they call (showChairCustomization and the like) stand
for your own code.
-
Place content relative to the user with SmartTether.
SmartTetherkeeps content positioned relative to the user:// SmartTether implementation@componentexport class SmartTether extends BaseScriptComponent {@inputverticalDistanceFromTarget: number = 0.1; // Vertical threshold@inputhorizontalDistanceFromTarget: number = 0.1; // Horizontal thresholdupdate() {// Get current positionsconst targetPos = this.target.getTransform().getWorldPosition();const objectPos = this.getSceneObject().getTransform().getWorldPosition();// Check if object needs repositioningif (this.needsRepositioning(targetPos, objectPos)) {// Calculate new position based on target's viewconst newPosition = this.calculateOptimalPosition(targetPos);// Apply new positionthis.getSceneObject().getTransform().setWorldPosition(newPosition);}}// Determines if the object is too far from ideal positionneedsRepositioning(targetPos: vec3, objectPos: vec3): boolean {// Implementation details...}// Calculates the best position relative to targetcalculateOptimalPosition(targetPos: vec3): vec3 {// Implementation details...}} -
React when the user selects a detected object. On SPECS, users select objects through Interaction Kit. Give the object you place at a detection an
Interactableand a collider, then handle itsonTriggerEndevent:import { Interactable } from 'InteractionKit.lspkg/Components/Interaction/Interactable/Interactable';// Example of custom interaction with a detected objectfunction setupObjectInteractions(detectionObject: SceneObject, label: string) {const interactable = detectionObject.getComponent(Interactable.getTypeName()) as Interactable;// Bind an action to the user selecting the objectinteractable.onTriggerEnd.add(() => {print('User selected ' + label);// Custom logic based on detected objectswitch (label) {case 'chair':showChairCustomization();break;case 'tv':playVideoOnTV();break;// Add more interactions for other classes}});// Add visual feedback for interactive objectsaddVisualFeedback(detectionObject);} -
Adapt content to what the model detects:
// Dynamic content systemfunction updateSceneBasedOnDetections(detections) {// Track what types of objects are detectedconst detectedClasses = {};detections.forEach((detection) => {detectedClasses[detection.label] = true;});// Customize experience based on detected objectsif (detectedClasses['chair'] && detectedClasses['table']) {// Show furniture arrangement UIshowFurnitureArrangementUI();} else if (detectedClasses['tv']) {// Show media controlsshowMediaControls();} else {// Default state when no relevant objects detectedshowSearchingUI();}} -
Analyze spatial relationships between detected objects. This example assumes you stored each detection's world position (for example, from
captureToWorldTransform) asworldPosition:// Analyzing spatial relationshipsfunction analyzeObjectRelationships(detections) {if (detections.length < 2) return;// Compare position of each pair of objectsfor (let i = 0; i < detections.length; i++) {for (let j = i + 1; j < detections.length; j++) {const pos1 = detections[i].worldPosition;const pos2 = detections[j].worldPosition;// Calculate distance between objectsconst distance = pos1.distance(pos2);// Check if objects are close to each otherif (distance < 100) {// 1 meter threshold (world units are centimeters)print(detections[i].label + ' is near ' + detections[j].label);// Custom logic for nearby objectshandleNearbyObjects(detections[i], detections[j]);}}}}
When you implement custom logic:
- Batch processing: process detections in batches rather than one by one.
- Throttle updates: don't update UI or logic every frame unless you need to.
- Level of detail: simplify processing for distant or less important objects.
- Asynchronous operations: move heavy computations off the main thread when possible.
For more sophisticated applications:
- State Machines: Use state management to control the flow of your experience
- Object Persistence: Implement tracking IDs to maintain object identity across frames
- Prediction: Estimate future positions for smoother tracking during occlusions
- Multi-Object Relationships: Build logic around how multiple detected objects relate to each other
- Environment Understanding: Combine ML detection with SPECS environment features for enhanced context
These patterns help create more robust and responsive AR experiences.
The complete SnapML workflow for SPECS
- Environment setup
- Dataset preparation
- Model training
- ONNX export
- W8A8 quantization and DLC conversion
- Model import
- Spatialization
- Custom logic
This guide has walked through the whole SnapML workflow for SPECS, from environment setup and model training to the Lens Studio scripts and custom interaction logic. With both the ML pipeline and the script architecture in hand, you can build AR experiences that interact with real-world objects.
Resources for SnapML on SPECS
- SnapML Templates GitHub Repository
- YOLOv7 GitHub Repository
- Roboflow Documentation
- SnapML Overview: the SnapML documentation on this site.
- Get Started with SPECS: where to begin with the SPECS documentation.
What you can build next with SnapML
Machine learning opens up new possibilities for AR interaction in SPECS experiences. By following this workflow, you've trained a custom object detection model, prepared it for SPECS with SnapML, and seen the scripts for spatialization, smoothing, and custom logic.
Cloud-based training environments, dataset management tools, and the script architecture in Lens Studio make it possible to build sophisticated machine learning features without extensive ML expertise.
As you continue developing for SPECS, experiment with different model architectures, datasets, detection parameters, and interaction patterns to make your AR experiences more engaging and responsive.