Audio Component
- Available on all platforms
This guide walks you through how to play sound in your Lens. You can find info about how to import audio file and other types of Audio Tracks here.
Sound Best Practices
When preparing your sound resource for Lens Studio, keep the following optimization recommendations in mind:
- Use the MP3 format
- Use mono instead of stereo
- Use sounds that are < 15 seconds
Playing Sound
Sounds are added to a scene using an Audio component added to an object. Sounds are then played using a short playback script.
Your Lens can play multiple sounds simultaneously (for example, looping background ambience paired with event based sound effects).
SPECS has no fixed limit on how many audio tracks a Lens plays at once, but each playing track costs CPU time and memory. Play only the tracks you need, and stop tracks you no longer need.
Import the Sound
To import your sound, drag and drop your audio file into the Asset Browser panel.
Create Audio Component
To create an object with an Audio component. Press "+" button at the Scene Hierarchy panel and select -> Audio.
Reference audio track by clicking on the Audio Track field and selecting your imported sound or dragging audio track onto theAudio Track field or the Audio component.
Audio Component UI
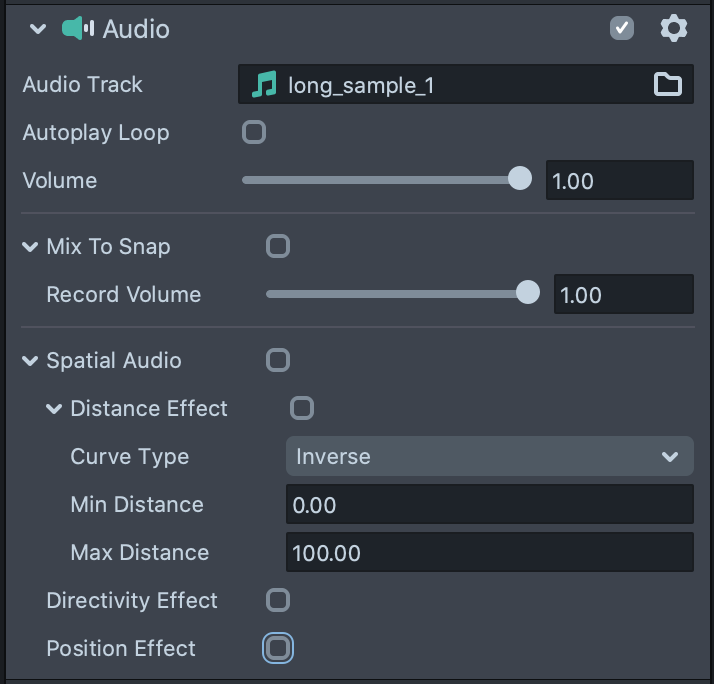
- Audio Track: the Audio Track asset to play
- Autoplay Loop: if enabled sound will play and loop automatically. This is great for looping music or background ambience
- Volume: set the volume of audio
- Mix to Snap: allows to record sound directly into the snap. In this case input from microphone will be ignored. Please note that in order for microphone audio to not be present on the final snap all Audio components should have this option
- Record volume: the volume of audio recorded to the snap
On SPECS, Mix to Snap is always on, and the Mix to Snap checkbox is ignored. The Audio component also has a Playback Mode, Low Power by default or Low Latency, that you set only from a script. See Audio on SPECS.
Spatial Audio
Spatial audio is the technique that allows to process sounds in such way so they appear to come from their real location in space. Spatial audio requires AudioListener Component.
- Distance Effect: allows to simulate sound attenuation which depends on distance to the audio listener
- Curve Type: describes how volume of the audio source changes with distance. See
Audio.DistanceCurveType - Min Distance: if distance is less than this value we do not apply distance effect at all
- Max Distance: if distance is larger than this value we can not hear any sounds
- Curve Type: describes how volume of the audio source changes with distance. See
- Directivity effect: applies directivity effect to the
Audiocomponent that simulates sound attenuation based on the orientation of theAudiocomponent relatively to the Audio Listener - Position Effect: applies effect to the
Audiocomponent that simulates the position of the sound by outputting different result to Left and Right channel. Best effect achieved in the head phones.
Playing Audio
To play sound any other way than Autoplay Loop we need to create a Script that will play the sound.
In the Asset Browser panel, select + -> ``Script. With the newly added script selected, head to the Inspector panel to replace the text in your script resource with the following code:
// Play Audio
// @input Component.AudioComponent audio
script.audio.play(1);
The play function takes in the number of times you want the sound to play as the input parameter. If you want the sound to play indefinitely, pass in -1 .
Connect the Script
We can now use this script to play the sound in the Audio component we created earlier.
With the object selected, drag the script you just created from the Asset Browser panel onto the Inspector panel. A component named after the script appears. Click its Audio field and pick the object's Audio component.
You can also use Behavior Script to play the audio.
Previewing the Sound
Press the refresh button in the Preview panel and you should be able to hear your sound.
Related Guides
Please refer to the guides below for additional information: