Screen Region and Device Simulation
- Snapchat: fully supported
- SPECS: not supported
- Camera Kit Web: partially supported
- Camera Kit Mobile: fully supported
- SnapchatFully supported
- SPECSNot supported
- Camera Kit WebPartially supported
- Camera Kit MobileFully supported
Screen Region
You can think of the Screen Region as a root Screen Transform: a basic rectangle that other Screen Transforms are positioned within.
The Screen Region component can be added to an object that's a child of an Orthographic Camera. When added, it takes over the Screen Transform settings and defines its rectangle to be based on the Snapchat UI.
By default, when adding a Screen Image or Screen Text, it includes a Screen Region parent set to Full Frame. With the Screen Region object selected in the Scene Hierarchy panel, you can adjust the Screen Region type the Inspector panel.
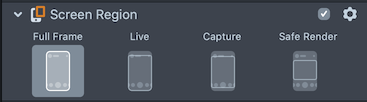
Full Frame: This region represents the entire area of the device screen
Preview: This region represents the area shown to the user in the camera screen. On some devices, this region is a subset of the capture region
Capture: This region represents the area shown to the user when capturing (recording) and what is sent as a Snap. On some devices, this region is a subset of full frame
Safe Render: This region represents a safe render shown for showing UI elements that will always be visible on screen and not overlapped by Snapchat UI elements
In a Camera Kit app, the Safe Render region avoids your app's UI, and the Full Frame region is the uncropped camera frame, which can extend beyond the screen. See Screen Region Component.
To test different device resolutions, in the Preview panel, use the Device Simulation dropdown (the phone icon) at the top of the panel to simulate a different device's screen resolution. When working with Screen Transform, it's recommended to always test your Lens UI against all of these different device resolutions.
In the below example, you can see how regions change with the change of a device.
Device Simulation
Before working with Screen Transform, it's important to understand how to test your Lenses at different device resolutions. To test different device resolutions, in the Preview panel, use the Device Simulation dropdown (the phone icon) at the top of the panel to simulate a different device's screen resolution.
When working with Screen Transform, it's recommended to always test your Lens UI against all of these different device resolutions.
For Snapchat projects, the bottom of the Device Simulation dropdown lets you choose the output target (for example Live Camera or Capture Mode) and, on devices that support it, a Snapchat UI overlay (for example No Snapchat UI or Showing Snapchat UI).

This is also useful when you are using different Live and Capture Render Targets